This Guide will cover the basics of the buildings in your town. As there are quite a few buildings, this will be a bit of a long read. My apologies in advance.
Note: I could only cover the buildings I have unlocked in my game. If more are opened at later Furnace levels, I’m unaware of them.
When you start the game, you will have only a few buildings available to you. As you grow, you will gain the ability to build and upgrade more.
Full Guide: https://docs.google.com/document/d/170UTc3L2QjWcEnSdcxOoIwXkLoVOn7MoPfhuXhAvh4g/edit?usp=drivesdk
Credit to: @Grendel

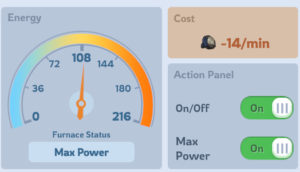
𝗙𝘂𝗿𝗻𝗮𝗰𝗲 Just a big, and probably dangerous bonfire at the beginning. This is your town HQ and the first construct you open. Its level determines both the max level you can upgrade other buildings to along with which buildings you can open up and when you open them up. Upgrading it will increase the amount of heat it produces and also increases your power. The Furnace has a secondary function that is equally as important: keeping your Survivors warm during the day, night, and during snowstorms. This helps prevent your Survivors from becoming sick. When sick, your Survivors will not be able to work until they are well again. There are two switches that can be toggled on/off when you tap on your Furnace. On/Off – This turns your Furnace either on or off. Your Furnace will use resources when operating. Wood in the early upgrades and coal in the later upgrades. The amount of resources used increases as you upgrade it. Max Power – Turning this on increases the amount of heat put out by your Furnace. It also increases the amount of resources used when on. In the early stages of the game you should be toggling this on during the nights and snowstorms to help keep your Survivors warm. Remember to toggle it off during the day to save a bit of resources. Later in the game you should have enough resources to keep this on all the time should you wish to do so.
-
Tip 1: Always make sure, especially in the early game where you will be building up your resource reserves, you have enough resources to keep your Furnace operating. To the point of stopping any upgrading you want to do if you notice your fuel getting low. When you are running low on fuel, you will get a warning about it telling you how many minutes you have left until your fuel runs out. You don’t want to get to this point as at this point, unless you have fuel in your inventory, it’s probably too late. When your Furnace runs out of fuel, your Survivors lose their source of heat and will get very sick, very quickly. Some will most likely even die. You will then need to wait until a new batch of Survivors find your town to replace those lost. Tip 2: You can access the Furnace controls(On/Off/Max Power) while upgrading it. To access the Furnace controls while it is upgrading, tap on your Furnace then tap the “Back” button.
Production Buildings Your production buildings produce the resources needed for the daily operations of your town, training/upgrading troops, and building upgrades. Each building can be upgraded and has furniture inside it that can be built and upgraded to increase the amount of resources produced, reduce the time needed to produce resources, and give a bump to your power. You will need to max out the upgrades of certain furniture inside the building before being able to upgrade the building to the next level. For the buildings to produce resources, you will need to assign Survivors to the workstations in them. Six Survivors can be assigned to each building. I do not yet know the maximum level these buildings can be upgraded to. I’m assuming it will be whatever the maximum level of the Furnace is. The workstations inside each building upgrade to the level of the building. The rest of the furniture upgrades to level 20.
𝗦𝗮𝘄𝗺𝗶𝗹𝗹 This building produces wood and is the first Production Building you will open. Furniture inside this building are: Workbench, Design Bench, Steam Engine, Changing Room, and two Bellows.
𝗛𝘂𝗻𝘁𝗲𝗿’𝘀 𝗛𝘂𝘁 This building produces meat and is the second Production Building you will open. Furniture inside this building are: Hunter’s Station, Animal Head Trophy, Mini Heater, Washer, Jaw Trap, and Hunter’s Box.
𝗖𝗼𝗮𝗹 𝗠𝗶𝗻𝗲 This building produces coal and is the third Production Building you will open. Furniture inside this building are: Sorting Station, Pulverizer, Changing Room, Pump, Shower Room, and Steam Engine.
𝗜𝗿𝗼𝗻 𝗠𝗶𝗻𝗲 This building produces iron and is the fourth Production Building you will open. Furniture inside this building are: Forging Bench, Mold, Changing Room, Garburator, Coat Rack, and Hydraulic Press.
𝗦𝘂𝗿𝘃𝗶𝘃𝗼𝗿 𝗦𝗵𝗲𝗹𝘁𝗲𝗿𝘀 These buildings house your Survivors giving them a place to rest, relax, and sleep. As of this writing, a maximum of eight Shelters can be built. As you upgrade the Shelters and furniture inside them, the amount of Survivors that can join your town increases up to a maximum of 32. Upgrading the Shelters increases Survivor Sleep Quality, Comfort, Mood, and Warmth along with a boost in power. You will need to max out the upgrades of certain furniture inside the building before being able to upgrade the building to the next level. Keeping these buildings and the furniture inside them upgraded as much as you can is important for the health and happiness of your Survivors. Until you get your Clinic built, your Survivors will come back here if they get sick. Furniture inside these buildings are: Bunk Bed, Desk, Wash Basin, Bookshelf, Toilet, Clothes Rack, Mini Heater, and Rug. Shelters can be upgraded to a maximum of level 10. The furniture inside can be upgraded to a maximum of level 20.
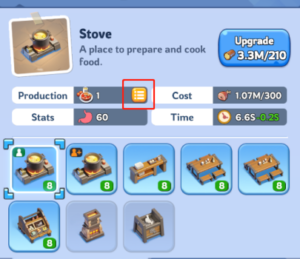
𝗖𝗼𝗼𝗸𝗵𝗼𝘂𝘀𝗲 Second building you open. Pretty self-explanatory. This is where your Survivors go to eat. Though not its only source, the Cookhouse uses a certain amount of meat from the Hunter’s Hut. Keep this in mind in the early game and make sure your Hunter’s Hut is producing the maximum amount of meat it can. This building is a main component in keeping your Survivors healthy and happy. If they aren’t getting the proper nutrition, their mood can drop and they will even get sick. This happened to me. Even though I was being good with setting the Furnace to max during the night and storms and my Shelters were all upgraded to their max, my Survivors started getting sick. Took me a minute, but I eventually discovered it was because my food quality was too low. Luckily, there is a menu you can change to increase the quality of food for your Survivors. When you tap on your Cookhouse, at the bottom you will see a little yellow menu button. Tapping that brings up a window where you can change what your cooks are serving to your Survivors to increase their nutrition, health, and happiness. Increasing the quality of food also increases meat use.

𝗖𝗹𝗶𝗻𝗶𝗰 Once built, this is where your Survivors go to recover when they are sick. Upgrading this building and the furniture inside will improve the efficacy of your treatments, reduce healing time, and increase the wellness restored by each treatment along with boosting your power. Furniture inside the Clinic are: Nursing Station, Sickbed, Medicine Cabinet, Wash Basin, Ward Trolley, Disinfection Cabinet, and Toilet. The Clinic can be upgraded to level 10 while the furniture inside can be upgraded to level 20. You will need to max out the upgrades of certain furniture inside the building before being able to upgrade the building to the next level. One Survivor can be assigned to this building.
𝗘𝘅𝗽𝗹𝗼𝗿𝗲𝗿𝘀 𝗖𝗮𝗯𝗶𝗻 If you’ve reached your maximum amount of offline Idle time, a chest will appear above this that you can directly receive your Idle rewards from. Otherwise, tapping this will take you to Exploration mode.
𝗦𝘂𝗴𝗴𝗲𝘀𝘁𝗶𝗼𝗻 𝗕𝗼𝘅 The Suggestion Box is split between two tabs: Suggestions and SOS. Suggestions Paying attention to the suggestions gives you an idea of what your Survivors are happy about, or not so happy about. If a Survivor isn’t happy about something, their mood drops and your Public Opinion Rating(POR) will drop. So making sure you take care of the unhappy suggestions is very important. SOS Every now and then you will be called upon to make a decision to settle an issue in your town. Depending on the choices you make to resolve the issue, your POR will either rise or fall. Do your best to keep your POR high to keep your Survivors happy and to get the best daily rewards.
𝐂𝐡𝐢𝐞𝐟’𝐬 𝐇𝐨𝐮𝐬𝐞 The Chief’s House contains Edicts that can be activated giving your town different boosts. Each Edict costs a certain amount of Contentment points. These points are gained when your Survivors are working or can be purchased with Diamonds. Night Shifts This Edict makes your Survivors work for 48 hours(Survivor time). While increasing production, it drops each Survivor’s mood by 10 points. It has a cool down time of eight hours(real time). 50,000 Contentment points to activate. Rush Job This Edict will give you five days(Survivor time) worth of resources automatically. This is a good one to use for a quick increase in resource supply. It has a cool-down time of one day(real time). 150,000 Contentment points to activate. Comprehensive Care This Edict immediately heals all sick Survivors and has a cool down time of four hours(real time). 150,000 Contentment points to activate. Productivity Day This Edict increases productivity to 100% across all workstations for 24 hours(Survivor time). It also decreases mood by 10 for each Survivor. Cool down time of 12 hours(real time). 50,000 Contentment points to activate. Double Time Increases new building construction and upgrades by 20% for five minutes(real time). Has a cool down time of one day(real time). Festivities +50 to mood and +30 to comfort for one day(Survivor time). Has a cool down time of one day(real time). 250,000 Contentment points to activate. Tip: Doubling up on Night Shifts and Productivity Day is a great way to quickly add resources to your supply. Just remember to pop Festivities after Night Shifts has ended to bring your Survivor’s mood and comfort back up.
𝐇𝐞𝐫𝐨 𝐇𝐚𝐥𝐥 This is where you use Platinum and Gold keys to recruit Heroes to your team. Platinum keys are used to open Advanced recruitment chests while Gold keys are used to open Epic recruitment chests. Awards from the chests are Heroes, Hero Shards, Exploration and Expedition Manuals, Hero XP, and a variety of speedups and resources. 𝐀𝐫𝐞𝐧𝐚 This is where you will go to test your PVP mettle against other Chief’s. Bring your strongest Heroes and climb the Ranks. Challenging and winning against other Chiefs awards you Arena points. You will not lose points if you lose. Nor will you gain or lose points by winning or losing if another Chief challenges you. To gain Arena points, YOU must initiate the challenge. Rewards for your performance in the Arena are handed out daily and weekly, with the Arena seasons being reset every week. Winning in the Arena also gets you Arena Tokens which can be used in the Arena Store.
𝐌𝐢𝐥𝐢𝐭𝐚𝐫𝐲 𝐁𝐮𝐢𝐥𝐝𝐢𝐧𝐠𝐬 These buildings are where you will be training/upgrading your troops. There are three different Troop types: Infantry, Marksmen, and Lancers. Each Troop type has their own building where they will be trained: Infantry Camp, Marksman Camp, and Lancer Camp. They upgrade to the level of your Furnace and are usually one of the upgrade requirements needed to upgrade your Furnace to the next level. Each upgrade increases the Training Capacity(how many troops you can train at one time), reduces training time, and boosts your power. At certain upgrade levels, you will gain access to higher tier troops. Once you have unlocked T5 troops, you will gain the ability to promote your lower tier troops to the highest trainable tier. Researching the technology Camp Expansion in the Growth tab of the Research Center will further increase the number of troops you can train at one time. Researching Training Tools, also in the Growth tab, decreases the time needed to train a group of troops.
𝐋𝐢𝐠𝐡𝐭𝐡𝐨𝐮𝐬𝐞 In this building, you will find Intelligence missions you can complete. These consist of rescuing Survivors, hunting beasts, or having your Heroes battle their way through an investigation of a building. You can upgrade the Searchlight by completing the required amount of missions shown at the bottom left of the screen. Upgrading the Searchlight allows for more missions to be found during refreshes along with better quality missions. Better quality missions reward you with better prizes. Once you have completed all the missions available, you will need to wait until the reset to do more. Always make sure to complete these as much as you can. The prizes are more than worth it.
𝐌𝐨𝐧𝐮𝐦𝐞𝐧𝐭 Tapping this displays a list of Zone and Alliance missions that can be completed. Reading the descriptions of the missions let’s you know what the Zone or your Alliance needs to do to complete the mission. Rewards for these are typically very good, so it’s an idea to try and complete as many of these as you can. 𝐄𝐦𝐛𝐚𝐬𝐬𝐲 This is one of your Alliance buildings. The purpose of it is to have a place to keep reinforcements that are sent to you by Alliance members. It is also what dictates the amount of help you can get from your Alliance members when it comes to Construction, Research, and Healing. Upgrading this building is typically a requirement to upgrade your Furnace to the next level. Upgrading the Embassy increases the total amount of reinforcements your Alliance can send you, the amount of times your Alliance members can help you speed up Construction/Research/Healing, and boosts your power. 𝐂𝐨𝐦𝐦𝐚𝐧𝐝 𝐂𝐞𝐧𝐭𝐞𝐫 Another Alliance building. Upgrading this building increases the total amount of troops you can have in a Rally that you start and increases the amount of troops you can have in your marches. It also boosts your power. Researching the technology Regimental Expansion in the Battle tab of the Research increases Troop Capacity in your marches, too.
𝐒𝐭𝐨𝐫𝐞𝐡𝐨𝐮𝐬𝐞 This is where your protected resources are kept. Resources stored here cannot be plundered by other Chiefs if they attack your town. Any resources not able to be stored here can, and will, be plundered by others that attack your town. You will also be able to collect speedups from the Storehouse. Collecting from the Storehouse is on an online timer. Upgrading this building increases the amount of resources that can be kept safe from plunder along with boosting your power. 𝐑𝐞𝐬𝐞𝐚𝐫𝐜𝐡 𝐂𝐞𝐧𝐭𝐞𝐫 As the name implies, this is where you will be researching new technologies to help strengthen and boost a number of facets in your town. There are three tabs in the Research Center: Growth, Economy, and Battle. Growth These technologies deal with the overall growth of your town and army. Economy These technologies deal with the overall growth of your resource production and gathering. Battle These technologies deal with increasing the overall power of your troops and marches. As you upgrade this building, new technologies are unlocked along with the ability to research the higher-level upgrades of some technologies.
𝐈𝐧𝐟𝐢𝐫𝐦𝐚𝐫𝐲 This is where your injured soldiers go to heal. Upgrading this building increases the Infirmary capacity along with giving you a boost in power. Keep the Infirmary at the same level of your HQ to ensure the maximum capacity. This is important because if your Infirmary fills up, your troops will start to die in battle. Upgrading the Ward Expansion technology in the Growth tab of the Research Center increases the capacity of your Infirmary, too. Researching Bandaging, also in the Growth tab, decreases healing time. 𝐄𝐧𝐥𝐢𝐬𝐭𝐦𝐞𝐧𝐭 𝐎𝐟𝐟𝐢𝐜𝐞 Eventually, you will unlock the Enlistment Office. This building helps you by taking in 70% of the troops you would normally lose in battle if your Infirmary is full. To clarify, this building does not save troops already killed in battle, but instead saves the injured troops that would normally go to your Infirmary if it wasn’t full. The Enlistment Office will only work once your Infirmary is completely full. Once troops start to populate it, you start to gain Loyalty points. These points can be used to reenlist the troops back into your army. 𝐁𝐚𝐫𝐫𝐢𝐜𝐚𝐝𝐞 Ummm… yeah… it’s a big freaking wall. At certain Furnace levels, you will be able to upgrade your town’s Barricade. Doing this strengthens your town defenses and helps in reducing damage when attacked by other Chiefs. When your town is attacked, the Barricade will start to burn. This will continue for 30 minutes. As it does, the durability of your Barricade will continue to decrease. If your Barricade’s durability ever reaches 0, your town will be automatically teleported to a random spot on the map. When burning, you can either wait the 30 minutes out or extinguish the blaze with Diamonds. You will then be provided with the option to repair the damage. Which, you know, you should probably do. Upgrading your Barricade increases its Durability and boosts your power.


