
연맹 영지

설명
연맹 영지

영지 보너스
상단에서 연맹이 보유한 자원을 확인할 수 있습니다. 보유한 연맹 자원은 연맹 건물을 짓고 연맹 과학기술을 연구하는데 사용됩니다. 연맹 본부와 깃발을 건설하고 자원 포인트를 연맹 영지에 포함 시키면 자동으로 연맹 자원을 획득할 수 있습니다.
위의 이미지에서 보는 것과 같이 당신의 도시가 연맹 영토 내에 위치 하고 있다면 화면 하단의 ‘보너스 수치’ 를 클릭하면 보너스 상세 정보를 확인하실 수 있습니다. 따라서 당신의 도시를 연맹 영토 내에 위치하는 것이 매우 중요합니다.

연맹 본부 (황야) : 첫번째로 건설할 수 있는 연맹 본부 입니다. 연맹 영지의 핵심 거점.
연맹 본부 (설원) : 두번째이자 마지막으로 건설할 수 있는 연맹 본부 입니다. 설원 본부는 설원 지역에만 건설을 할 수 있습니다.
연맹 깃발
연맹 깃발을 중심으로 7×7 정사각형의 연맹 영지를 확장할 수 있다.
연맹 깃발로 연맹 영지를 확장할 수 있지만, 확장할 영토는 기존 영지와 인접한 상태여야 합니다.
연맹 깃발 건설 팁
건설한 깃발은 다른 연맹의 깃발과 겹쳐 건설을 할 수 있으며 우회하여 영토 확장은 가능합니다.


연맹 자원
연맹 본부와 깃발을 건설하고 자원 포인트를 연맹 영지에 포함시키면 연맹 자원 포인트는 매시간 자동으로 연맹 자원을 생산합니다.
맵에서 왼쪽 상단의 자원 필터를 클릭하고 지도를 축소/확대하면 연맹 자원 포인트를 확인 하실 수 있습니다.
참고
연맹 자원 포인트는 연맹 영토(깃발 건설을 통해 확장된 영토)의 75%를 차지해야 연맹 자원을 생산합니다.
요구 사항
| 레벨 | 요구조건 | 비용 |
|---|---|---|
| 0~10 | ||
| 11~15 |
|
|
| 16~20 |
|
|
| 21~30 |
|
|
| 31~40 |
|
|
| 41~50 |
|
|
| 51~60 |
|
|
| 61~70 |
|
|
| 71~80 |
|
|
| 81~90 |
|
|
| 91~100 |
|
|
| 101~110 |
|
|
| 111~120 |
|
|
| 121~130 |
|
|
| 131~135 |
|
|
| 136~140 |
|
|
| 141~145 |
|
|
| 146~150 |
|
|
| 151~155 |
|
|
| 156~160 |
|
|
| 161~165 |
|
|
| 166~170 |
|
|
| 171~175 |
|
|
| 176~180 |
|
|
| 181~185 |
|
|
| 186~190 |
|
|
| 191~195 |
|
|
| 196~200 |
|
|
| 201~205 |
|
|
| 206~210 |
|
|
| 211~225 |
|
|
| 226~235 |
|
|
| 236~245 |
|
|
| 246~255 |
|
|
| 256~265 |
|
|
| 266~275 |
|
|
| 276~285 |
|
팁 & 가이드
How to Pick HQ

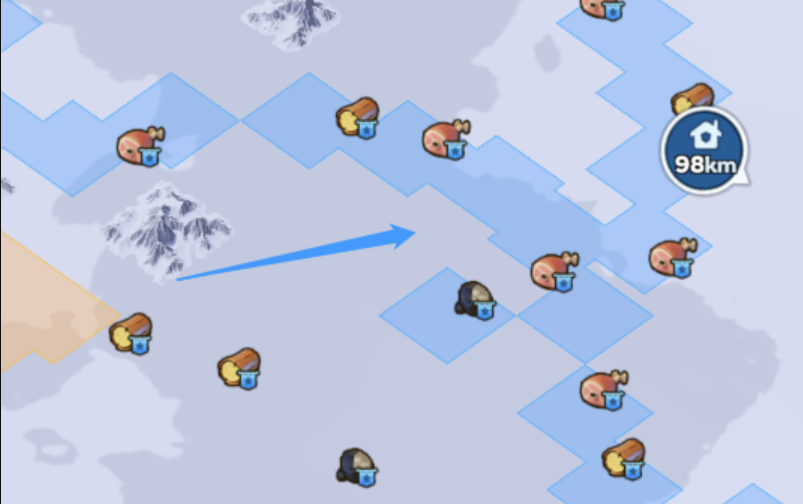
You can get Alliance Iron Mine before the fog is lifted by placing the banner properly at the border of the Tundra.
That makes it easy to pick HQ. Just pick somewhere close to Tundra, basically somewhere near the blue line in the picture above.
STEP 1: Search for the alliance iron mine near the blue line within your banner’s reach. You may need to use the alliance marker for help since zooming in and out is not optimal during Territory Building.

STEP 2: Draw a line and mark the Alliance iron mine on the map

STEP 3: Zoom out to determine whether the spot surrounds potential buildings ( like Facilities ). Build your Alliance HQ in the middle and then build banners towards facilities and the Alliance iron mine later.
Note: You don’t need to path toward Fortress, you can position the HQ within a good distance to Fortresses, so you do not always have to teleport and simply rally from the hive depending on your State.
STEP 4: Have a rough draft of which facility building you wanna take.
A Reference for the State Map:
- Facilities location with the type and level.
- Fortress Locations.
- Strongholds Locations.
- Sunfire Castle Location.

- Facilities Locations:

Step 5: Time to build! Try your best to have as many alliance resources as possible while pathing towards other facilities. This planning is hard. Stay Strong!
Path Towards Alliance Iron Mine. You will need it for alliance technology. If you don’t stock it earlier, your alliance tech will be stuck for 2-3 days.

Priority for Alliance Tech:Growth (Alliance Regiminatation) > Territory(Tactical Expansion + Storehouse Expansion) > Battle (Rally Expansion)
Building HQ and Bear: ( You do not need Alliance Resources when you relocate the Headquarters )
- Icefield HQ does not require Alliance Resources.
- Both Bear Traps needs the same amount of resources, which are:
50k Meat
50k Wood
10k Coal
1k Iron
- Alliance Resources needed for Tundra HQ:
700k meat
700k wood
400k coal
200k iron
If you’re a Top 5 Alliance, I do recommend you place your new HQ near one of the strongholds. The benefits will be listed as follows
- Higher resources nodes (lvl. 6-8)
- Less march time to Strongholds, Fortresses, and Level 3/4 Facilities, which means you can save a lot of advanced teleports for your alliance.
- Usually, there will be more Alliance iron mines near the strongholds.
Note: If your Alliance is not Strong, move slowly and especially after the other alliances have made their decision, so you won’t engage in fights for Facilities and Territories too early.
The ideal ratio for wood, meat, coal and iron will be 4:4:2:1 Please place your banners properly for those alliance resources. If you cannot organize it properly, you will end up like us hoarding too many irons…while waiting for other rss.
After settling down your HQ, you need to dismantle the Hunting Trap and rebuild it near the new HQ or in a position that will keep your members within 1-2 Mins march time for Crazy Joe. Make sure you have enough resources and time to do this! So you won’t ruin the event day.
The position of placing a bear trap is also important. I do recommend you drop it somewhere with fewer alliance resources and far away from mountains, so the place will be neat and clean for your alliance members.

The best position to settle your alliance members is to have the best players close to Bear Trap to save the rally time. But usually, it’s really hard to organize all the members to port to the designated place. They pick a place randomly!
Secured Alliance Gathering Nodes:
Gathering squads can collect Secured Resources directly from Secured Alliance Gathering Nodes quickly without the threat of attacks. It is perfect to gather them during the Brothers in Arms event.
Only 1 secured alliance gathering node can be placed at a time!

Clearance Tool:
- Alliance Bomb: It can be placed within alliance territory to clear unused Resource Nodes, Beasts, and Polar Terrors from the blast radius. Keep in mind that Alliance Resources cannot be cleared using this tool.

Tips for Banner Building:
- Alliance Building Guidelines:
- Strongholds and Fortresses do not need a banner connected to them.
- Alliance farms only need to be occupied by 75% of your territory to be claimed by your Alliance. Alliance Resources are 4 Tiles, so you just need 3/4 to claim it.
- Facilities have to be connected with your Alliance Banner to be occupied.
- Alliance Farms do not have levels, but resource nodes do. If you zoom out of the Map and switch to Resources (Top left side), you will see different colours, which are those in the picture below

- Tips on Building:
-
- Build your HQ in the centre of Facilities
- Use Markers to mark where you want to build. This will help the R4s to know where to carry on.
- Make sure you are occupying Alliance Resource Nodes so you have enough Resources to keep expanding your Territory.

